Categories
Important Links

Who's Online
1 member online.
How To Swap Western Digital Hard Drive PCB Boards
When the Western Digital HDD damaged, many people don't know the problem was caused by HDD's hardware corrupted or PCB corrupted. Now we will do a simple description here:
HDD can't spin up. Either no sound or a short, quiet tickling sound can be heard; A burning smell can be sensed coming from the HDD or PCB; Burned components on the PCB; PCB's interface damaged. All the problems are caused by PCB corrupted.
In other cases, HDD's problems are unlikely caused by PCB. Such as HDD PCB was very hot; HDD can spin, but can't be recognized; HDD be recognized slowly, etc. When you swap PCB, you need to know your PCB's board number. For example:
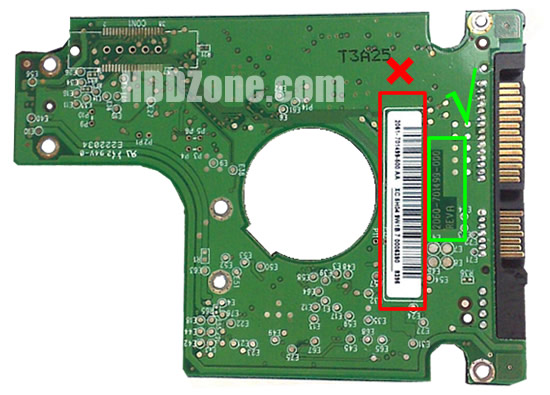
The number in the green circle is the board number
This Western Digital PCB's board number is 2060-701499-000 REV A. In general, Western Digital PCB's board number begins with 2060-. Most friends think the two-dimensional on the white label as the board number.
When you get the donor PCB, you need to move your original/damaged PCB's BIOS the donor PCB. Suggest using the hot-air gun. If you can't do it by yourself, you can find a cell phone/computer repair shop help you. Some Western Digital PCB doesn't have separate BIOS. The BIOS is integrated on the Main Controller IC. You should exchange the Main Controller IC to let the HDD be recognized. Move the Main Controller IC is a complex job.
Changing BIOS note:
Move the BIOS from your original PCB by using hot-air gun, then solder it on the replacement board. Please note when you change the BIOS, you need to confirm the BIOS orientation. Otherwise, the BIOS will be burnt. Also you should confirm the BIOS be solder firm.
Why Choose US ...
✓ Over 1000+ PCB Types;
✓ 100% Tested Working;
✓ Free Shipping Worldwide;
✓ Secure Shopping by Paypal;
✓ Professional Technical Support;
✓ Customer Loyalty Discount;

Copyright © 2024 HDDZone.com. All rights reserved.