Categories
Important Links

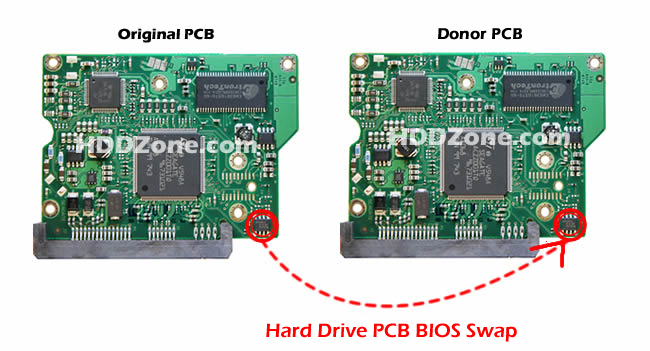
Hard Drive PCB BIOS Swap
If you have a hard drive that is not working properly due to a damaged PCB (printed circuit board), you may be able to fix it by swapping the BIOS chip from a donor PCB. This is a risky procedure that requires some technical skills and specialized tools, but it can save you the cost and hassle of data recovery services or a new drive.
Before attempting this procedure, be aware that:
- Hard drives are delicate and sensitive to static electricity, shock, and contamination. Handle them with care and avoid touching the exposed components.
- Swapping the PCB BIOS may not work if the damage is not limited to the PCB, but also affects the firmware or the platters. In such cases, you may need professional help.
- Swapping the PCB BIOS may void the warranty of your drive or make it incompatible with your system. Check the specifications and compatibility of the donor PCB before proceeding.
To swap a hard drive PCB BIOS, you will need:
- A donor PCB of the same model and revision as your damaged one (hard drive pcb replacement). You can find one on HDDZone.com or salvage it from a similar drive.
- A clean and static-free work area, preferably with an antistatic mat and wrist strap.
- A set of screwdrivers and pliers to remove and install the PCB.
- A hot air gun or a soldering iron with a fine tip to desolder and solder the BIOS chip.
- A magnifying glass or microscope to inspect the pins and traces of the chip.
Here are the steps to follow:
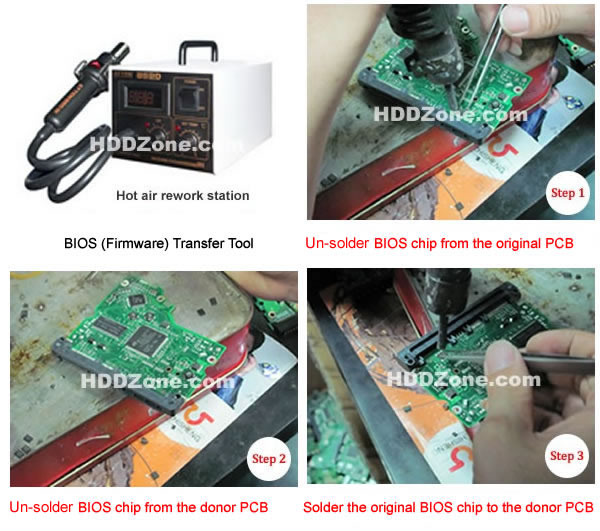
1. Disassemble the donor PCB and remove the BIOS chip. Use the hot air gun or soldering iron to melt the solder joints of the chip and gently pry it off with a tool. Be careful not to damage the pins or traces of the chip or the board.
2. Disassemble your damaged PCB and remove the BIOS chip. If it is not damaged, you can skip this step and reuse it. Otherwise, repeat the desoldering process as above.
3. Clean both PCBs and inspect them for any defects or differences. Check the markings, labels, and components to ensure they match. If there are any discrepancies, do not proceed.
4. Place the donor BIOS chip on the corresponding location of your damaged PCB. Align the pins carefully and apply some flux to help the soldering process. Use the hot air gun or soldering iron to solder each pin securely.
5. Reassemble your repaired PCB and test it on a compatible system. Check if it is recognized by the BIOS, if it spins up, if it makes any unusual noises, or if it can access your data.
If everything goes well, you should have a working hard drive again. If not, you may have to repeat some steps or seek further assistance. Remember to back up your data regularly and avoid exposing your drives to extreme conditions or hazards. Good luck!
Which chip on the PCB is the BIOS chip?
Most people do not know what is the BIOS chip on HDD PCB. All of the 8pins chip(s) (4 pins on each sides) with 25P05VP、25P10VP、25F512、25F1024、25F1024AN、SST25VF512、SST25VF010, etc. are the BIOS. It is easy to be found, because there are not many 8pins chips on the PCB.
Note: When you change the BIOS, please confirm the words orientation on the BIOS. Please don't solder it on backwards; otherwise, the BIOS will be brunt.
If there is no matching 8pins BIOS chip on the PCB, it means the BIOS is integrated on the Main Chip IC. It is more complex to exchange the Main Chip IC than exchange the BIOS. If you should do, please do several test on the HDD's PCBs which don't have the important data.
Video Tutorial: Hard Drive PCB BIOS Swap
Tips: Most of the TV/Phone/electronic repair shop can offer these services for just $5-20
Why Choose US?
✓ Over 1000+ PCB Types;
✓ 100% Tested Working;
✓ Free Shipping Worldwide;
✓ Secure Shopping by Paypal;
✓ Professional Technical Support;
✓ Customer Loyalty Discount;