Categories
Important Links

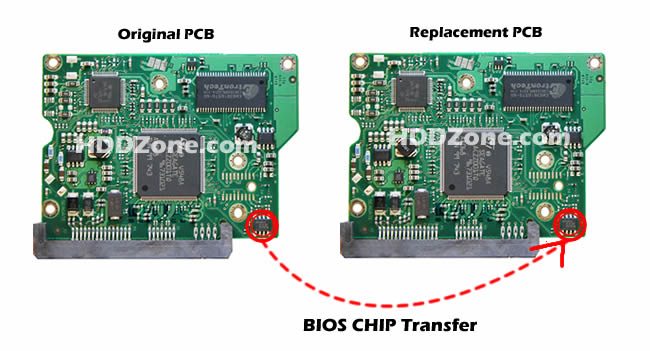
Hard Drive PCB Firmware Transfer
Hard drive PCB firmware transfer (also called hard drive PCB BIOS swap) is a procedure that we must do after purchasing a replacement circuit(controller) board, a simple circuit board replacing will not make a faulty hard drive operational, we usually encounter this situation: after the new board is replaced, the hard disk doesn't spin, the hard disk has no response, or the size of the disk is different when we saw in the windows BIOS screen. That is because we did not do a very important procedure: firmware transfer.
Why transfer the firmware when swapping HDD PCBs
We know PCB includes 2 parts: hardware (components) and firmware (data in the bios chip); The firmware includes HDD's unique configuration data to access the hard disk system area . If PCB firmware is missing or incorrect, there is no access to the hard drive, and no access to user data. so we have to swap the BIOS from your original board to the replacement board.
Tools we need to transfer the firmware
- Screwdriver (T6/T8, available for purchase when purchasing a PCB);
- Hot-Air Gun (Required);
- Tweezers;
Where is the PCB's firmware stored?
The operation of transfer the PCB firmware is not complicated. For most hard disk PCBs, it is easy to find the chip where the firmware are stored (we call it the BIOS chip), all of the 8pins (4 pins on each sides) with 25P05VP、25P10VP、25F512、25F1024、25F1024AN、SST25VF512、SST25VF010, etc. are the BIOS. It is easy to be found, because there are not many 8pins chips on the PCB. (For every board sold by HDDZONE, we will make it clear to you the BIOS chip position, you do not have to worry about).
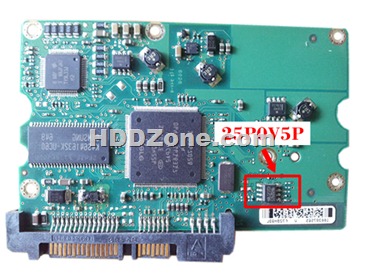
Hard Drive PCB's BIOS Chip
For some of the PCB boards, there are two BIOS chips. you should swap both of them, this is not complicated. All you need to do is operate step by step for 2 times.

Hard Drive PCB with Two BIOS
For the 3rd case, it is not general users can operate, because this process requires a certain amount of technology, this situation is because the board's BIOS chip is integrated into the main controller chip, so we must replace the main controller chip, because the main chip has more than 8 pins, this is why we recommend that you take the board to the data recovery company for help. (we also have a clear indication on our product page, please pay attention when buying).

Hard Drive PCB (Main Controller Chip)
However, most users can rest assured because the second and third situations are rare.
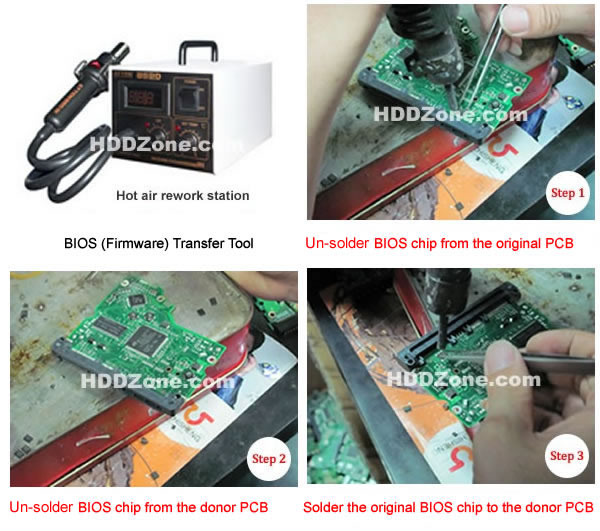
Hard Drive PCB Firmware Transfer Tutorial (Images)
The following pictures simple describes the process of hard disk pcb firmware transfer.
Hard Drive PCB Firmware Transfer Tutorial (Video)
In order to let users more intuitively understand the replacement process of the hard disk circuit board firmware transfer, we made this video. The video shows the BIOS transfer process in detail. This video shows the simplest firmware replacement process with PCB which has only one BIOS. The replacement process video of the main controller chip will be released shortly afterwards. Hard Drive PCB Firmware Transfer
4 Steps to transfer the hard drive PCB firmware- Open the hard disk with screwdrivers and uninstall the circuit board.
- Remove the BIOS chips from both your original and the replacement boards with the hot-air gun
- Solder your original PCB's BIOS chip to the replacement HDD PCB;
- Put the drive back to your computer and have a test.
It should be noted that if the original BIOS is damaged, this method will not enable the hard disk to return to normal operation. For the reason, please refer to the above info "Why transfer the firmware when replacing HDD PCBs". For this situation please send your hard disk to a professional data recovery company.
Before transfer firmware, you should know:
Usually the temperature of the transfer we generally recommend is 270-300℃, high temperature may cause damage to the chip, if you have not done similar operations, you can find some discarded boards to do more tests.
I can't transfer the firmware, what should I do?
The transfer process looks simple, but if you still can't do it or you can't find the tools for this work, you can also find a repair shop near you house to help, probably costs 5-20 US dollars, like cell phone repair shop, TV repair shop, etc., you can also be specifically looking for Hard disk repair company to help.
After replacing the firmware, can my hard disk work normally?
Not necessarily, first of all you should ensure that the reason for the hard disk damage is because of a circuit board failure. If not, this will not help.
Note: The below symptoms of HDD/PCB are may be caused by failure PCB:
- HDD can't spin up. Either no sound or a short, quiet tickling sound can be heard.
- A burning smell can be sensed coming from the HDD or PCB.
- Burned components on the PCB.
- The HDD be connected to wrong power supply.
- PCB's interface damaged.
Note: Replacement the PCB will not solve the problem below:
- The drive will power up normally (no ticking noises, errors etc) but will not be recognized by the computer
- The drive will power up normally and be recognized correctly but will report a size of 0 bytes
- The drive will power up but report SMART errors on boot
Those problem is caused by the HDD firmware corrupted.
Why Choose US?
✓ Over 1000+ PCB Types;
✓ 100% Tested Working;
✓ Free Shipping Worldwide;
✓ Secure Shopping by Paypal;
✓ Professional Technical Support;
✓ Customer Loyalty Discount;