Categories
Important Links

Who's Online
Western Digital PCB Swap Replacement Guide
Western Digital Hard Drive PCB Swap Replacement Guide:
Match the board number which is etched on the PCB. The number is printed on the PCB's back side (the side without chips) For example:
a) Western Digital Hard Drive(IDE) PCB Swap Replacement Guide:
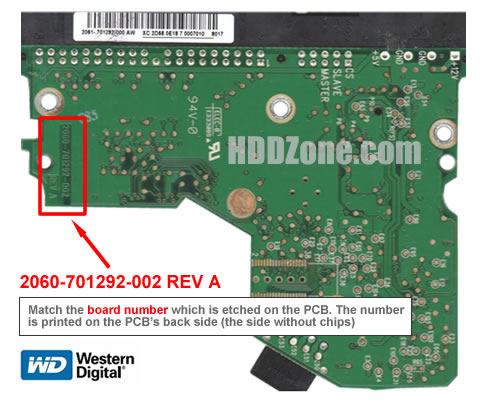
Western Digital Hard Drive PCB Swap Guide(WD IDE HDD)
2060-701292-002 REV A is the board number should to be match.
b) Western Digital Hard Drive(2.5") PCB Swap Replacement Guide:
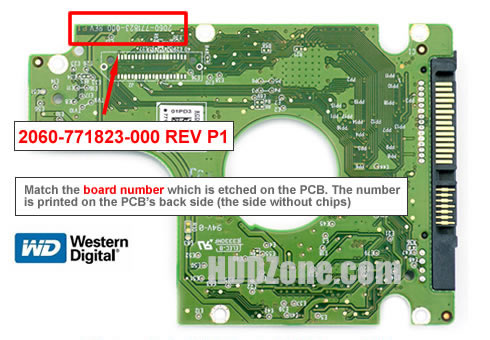
Western Digital Hard Drive PCB Swap Guide(WD Laptop HDD)
2060-771823-000 REV P1 is the board number should to be match.
c) Western Digital Hard Drive(SATA) PCB Swap Replacement Guide:

Western Digital Hard Drive PCB Swap Guide(WD SATA HDD)
2060-701590-001 REV A is the board number should to be match.
If you still don't know which is your donor PCB, please feel free to contact us.
Due to the large number of products, we can't list all the board numbers of Western Digital PCB. If you don't find the board number you need here, please contact us.
1. We should know not every HDD's problem is caused by damaged PCB. Damaged PCB has the below symptoms:
Damaged PCB always has the obvious burnt marks.
The HDD can't spin. You can't hear any noise or just hear a tick sound, which means the PCB is probably faulty.
Which HDD's problems are not caused by PCB:
HDD has a buzzing voice or a sound like it is trying to spin.
HDD can spin. However, it makes a lower clicking noise. It spins for a moment and then slow down.
HDD will power up normally (no ticking noises, errors etc) but will not be recognized by the computer
HDD will power up normally and be recognized correctly but will report a size of 0 bytes
HDD will power up but report SMART errors on boot
2. If you make sure your HDD's problem was caused by PCB failure, you should know how to find the matching PCB now.
3. In most cases, swap PCB is not directly change the fault PCB with the donor PCB. Should confirm the donor PCB should be adapted for the HDD.
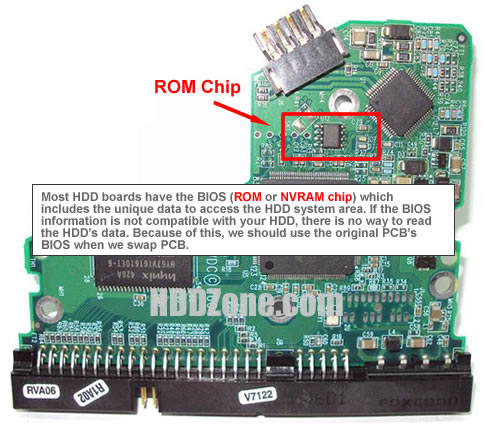
Most HDD boards have the BIOS (ROM or NVRAM chip) which includes the unique data to access the HDD system area. If the BIOS information is not compatible with your HDD, there is no way to read the HDD's data. Because of this, we should use the original PCB's BISO when we swap PCB.
BIOS is the 8pins (4 pins on each sides) with 25P05VP、25P10VP、25F512、25F1024、25F1024AN、SST25VF512、SST25VF010, etc.
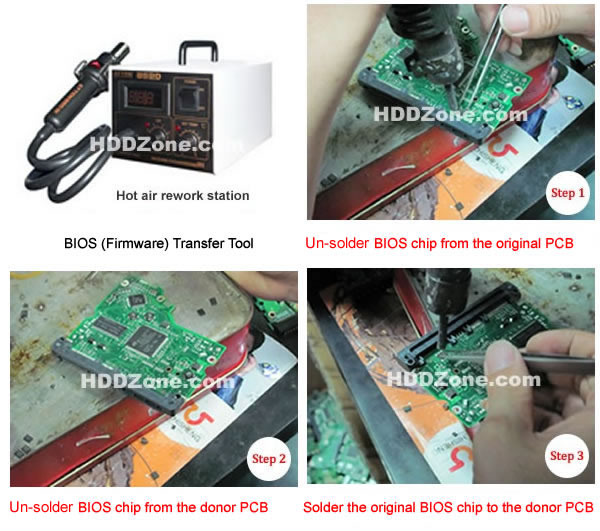
Hard Drive PCB Swap Guide(ROM Chips Exchange)
How to change BIOS
You can move the BIOS from your original PCB by using hot-air gun, then solder it on the replacement board. Or you can find the electronics repair shop to help you.
If there is no BIOS on the PCB, it means the BIOS is integrated on the Main Controller IC
You should exchange the Main Controller IC to let the HDD be recognized. Move the Main Controller IC (the biggest chip on the board) is complex jobs which need you have certain technique. Some electronics repair shop can do it.
Why Choose US ...
✓ Over 1000+ PCB Types;
✓ 100% Tested Working;
✓ Free Shipping Worldwide;
✓ Secure Shopping by Paypal;
✓ Professional Technical Support;
✓ Customer Loyalty Discount;

Copyright © 2024 HDDZone.com. All rights reserved.