Categories
Important Links

How to repair the damaged HDD
If your computer fails, you will feel very convenient. When you HDD fails, it means a disaster. In general, If you don't back up the data, HDD failure means that you may lose all the data. However, the data in the HDD will not be recovered or can be recovered some data? Now we will tell you how to recover some data. Warn: When you use these methods, you should bear the risk. You can use these methods before you decide to throw or replace the damaged HDD.
How to repair the damaged HDD Part I
Confirm the fault. You can check the reasons caused the HDD can't be recognized, then judge the HDD is really damaged or not. If your HDD is making continue and clear noise, please skip the following content and directly read the second part. Because your HDD was damaged.
Check the hardware connections. This is the first place need to be check. If you find it is hardware connection problem, just need minimal cost and time can repair it.Make sure the computer is connected well. If the pet inadvertently knocked the power or damage the power code, the computer is not working.Open the Computer chassis. Check the HDD's data cable (IDE or SATA) and the power cable was plugged in tight or not. Confirm the interface is connected well, no pins are bent or damaged.

Check the HDD's PCB. If the HDD's PCB was damaged, in this case, due to loss of control, the HDD would stop working.
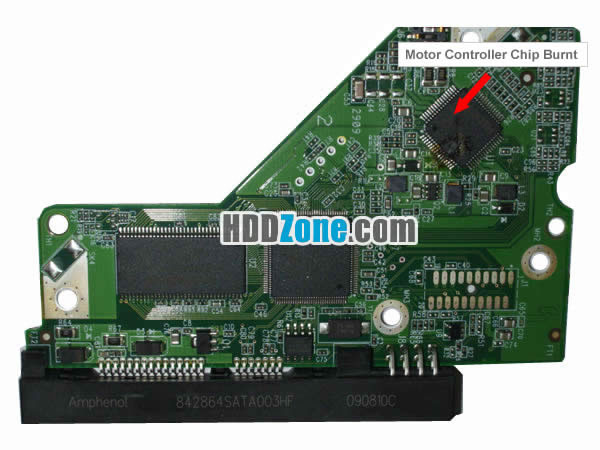
- Find the damage trail – burnt or charred marks. If you find these signs, you can slightly relieve. It means that in most cases, you can repair the fault by a relatively simple method. Just need to replace the damaged components.
- If you want to replace the whole PCB, you can search the donor one on HDDZone.com.
You can search for "HDD replacement Parts". You may find several different repair methods:
DIY: For adventurous people, DIY is the popular way. HDDZone provides all kinds of harddrive pcb circuit boards for the DIY enthusiasts. This is the least expensive option.
When you get the donor PCB, you need to remove the old PCB from the HDD(unscrewing the five small screws and keep them well)
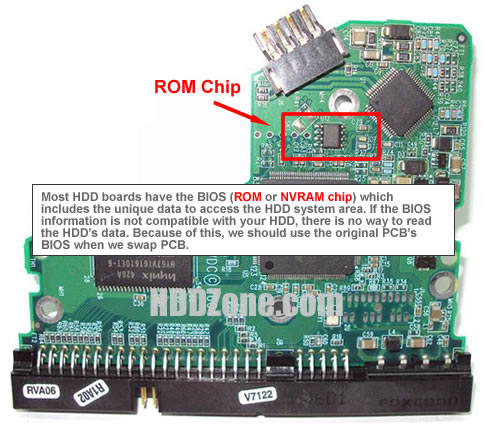
Move your original PCB's BIOS(Main Controller IC) to the donor PCB. Confirm the words orientation on the BIOS. Please don't solder it on backwards; otherwise, the BIOS will be brunt.
Install the new PCB, make sure it is firmly connected with the HDD, and then retighten the screws.
Install the HDD into the computer, and then turn on the power. If the HDD is working properly, then began to celebrate it! At this point you should consider backing up data on your HDD.
Find a data recovery company: This is another way to repair the HDD. Or at least you can recover the data on the HDD. This is the safer way than DIY. However, you need to spend a lot of money this way. So you need to make a trade-off between maintenance costs and the value of the data.
If the HDD is not working at this time after replace the PCB. Please read the Part II
Why Choose US?
✓ Over 1000+ PCB Types;
✓ 100% Tested Working;
✓ Free Shipping Worldwide;
✓ Secure Shopping by Paypal;
✓ Professional Technical Support;
✓ Customer Loyalty Discount;